[ゼロから作るDeep Learning](https://www.amazon.co.jp/ゼロから作るDeep-Learning-―Pythonで学ぶディープラーニングの理論と実装-斎藤-康毅/dp/4873117585/ref=sr_1_1?ie=UTF8&qid=1527370773&sr=8-1&keywords=ゼロから作る+deep+learning)の2回目の読書が終了しました。
前回読んだ時も実際に手を動かしながら確認したのですが、他の本を読んんだりして再度読み返すと更に理解が深まった気がします。
写経しただけでは実際に理解したとは言えないので、Kerasを使ってCNNを実際に作成して見る事にしました。
(実際には[Kerasのサンプルソース](https://github.com/keras-team/keras/blob/master/examples/mnist_cnn.py)を参考にしまくっています)
## CNNネットワーク
ネットワークは以下の形です。
```
画像 -> 1.Conv -> ReLU -> 2.Pooling -> 3.Affine -> ReLU -> 4.Affine -> Softmax
```
#### 1.Conv
畳み込み層, Filter:30, Filter Size:(5,5), Pading:0, Strides:1
#### 2.Pooling
Maxプーリング
#### 3.Affine
100層の隠れ層(全結合層)
#### 4.Affine
出力層10層の全結合層
### ポイント
Kerasで実装する際には、いくつかの層をまとめて記述する必要があります。
例えば、ConvとReLUはConv2Dでまとめて記述します。
PoolingはMaxPooling2Dを使い, 全結合層はDenseを使います。
Denseは出力のactivationを指定する事ができるので、ReLUを指定します。
## ソースコード
```python
# coding:utf-8
#
# Kerasでゼロから作るDeep LearningのCNNを作成する
#
import keras
from keras.datasets import mnist
from keras.models import Sequential
from keras.layers import Dense, Flatten, Dropout
from keras.layers import Conv2D, MaxPooling2D
from keras import backend as K
import pandas as pd
import matplotlib.pyplot as plt
batch_size = 32
num_classes = 10
epochs = 20
# input image demensions
img_rows, img_cols = 28, 28
# the data, split between tran and sets
(x_train, y_train), (x_test, y_test) = mnist.load_data()
# 画像のチャンネルが先か後かでデータをreshapeする
print(K.image_data_format())
if K.image_data_format() == 'channels_first':
x_train = x_train.reshape(x_train.shape[0], 1, img_rows, img_cols)
x_test = x_test.reshape(x_test.shape[0], 1, img_rows, img_cols)
input_shape = (1, img_rows, img_cols)
else:
x_train = x_train.reshape(x_train.shape[0], img_rows, img_cols, 1)
x_test = x_test.reshape(x_test.shape[0], img_rows, img_cols, 1)
input_shape = (img_rows, img_cols, 1)
print(x_train.shape)
#(60000, 28, 28, 1)が出力される
# 学習データを0-1の範囲に正規化する
x_train = x_train.astype('float32')
x_test = x_test.astype('float32')
x_train /= 255
x_test /= 255
print('x_train shape:', x_train.shape)
print(x_train.shape[0], 'train samples')
print(x_test.shape[0], 'test samples')
# convertclass vectors to binary matrices
# one_hot_label に変換する処理
y_train = keras.utils.to_categorical(y_train, num_classes)
y_test = keras.utils.to_categorical(y_test, num_classes)
#
# ここからモデルの構築
# Conv-ReLU-Pooling -- Affine-ReLU -- Affine-Softmax
#
model = Sequential()
model.add(Conv2D(30, kernel_size=(5, 5), strides=1,
activation='relu',
input_shape=input_shape))
model.add(MaxPooling2D(pool_size=(2, 2)))
# これを入れないとエラーになる
model.add(Flatten())
model.add(Dense(100, activation='relu'))
model.add(Dense(num_classes, activation='softmax'))
# 損失関数 交差エントロピー誤差平均
# 最適化関数 Adadelta
model.compile(loss=keras.losses.categorical_crossentropy,
optimizer=keras.optimizers.Adadelta(),
metrics=['accuracy'])
# 学習を行う
history = model.fit(x_train, y_train,
batch_size=batch_size,
epochs=epochs,
verbose=1,
validation_data=(x_test, y_test))
# plot learning history
plt.style.use("ggplot")
df = pd.DataFrame(history.history)
df.index += 1
df.index.name = "epoch"
df[["acc", "val_acc"]].plot(linewidth=2)
plt.savefig("plt_acc_history.png")
df[["loss", "val_loss"]].plot(linewidth=2)
plt.savefig("plt_loss_history.png")
score = model.evaluate(x_test, y_test)
print("Test loss:", score[0])
print("Test accuracy:", score[1])
```
Kerasで作成する上でのポイントはConv2D層の後にFlatten()を入れる必要があります。
それを入れないと実行時にエラーになってしまいます。
```
`gutter:false;
ValueError: Error when checking target: expected dense_2 to have 4 dimensions, but got array with shape (60000, 10)
```
解決の参考にしたのは以下のページです
[stackoverflow](https://stackoverflow.com/questions/47050571/valueerror-error-when-checking-target-expected-dense-2-to-have-4-dimensions-b)
参考にしたソースにも入っていたのですが、ネットワークを作成する部分は自分で作成したので必要な事に気づくのが遅れました。
### 学習結果
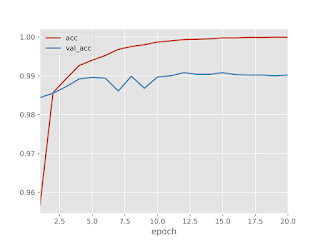
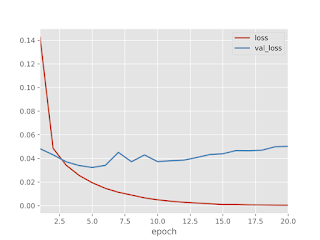
学習結果は認識率99%のかなり良い感じ。
認識率と損失のグラフを確認すると、訓練データとテストデータに若干乖離があります。
(過学習の恐れあり)


過学習を防ぐためには、Dropout層を入れると良いようなのでDropout層を入れて実験してみました。
その結果はまたの機会にまとめます。


0 件のコメント :
コメントを投稿